

User Interface Preview
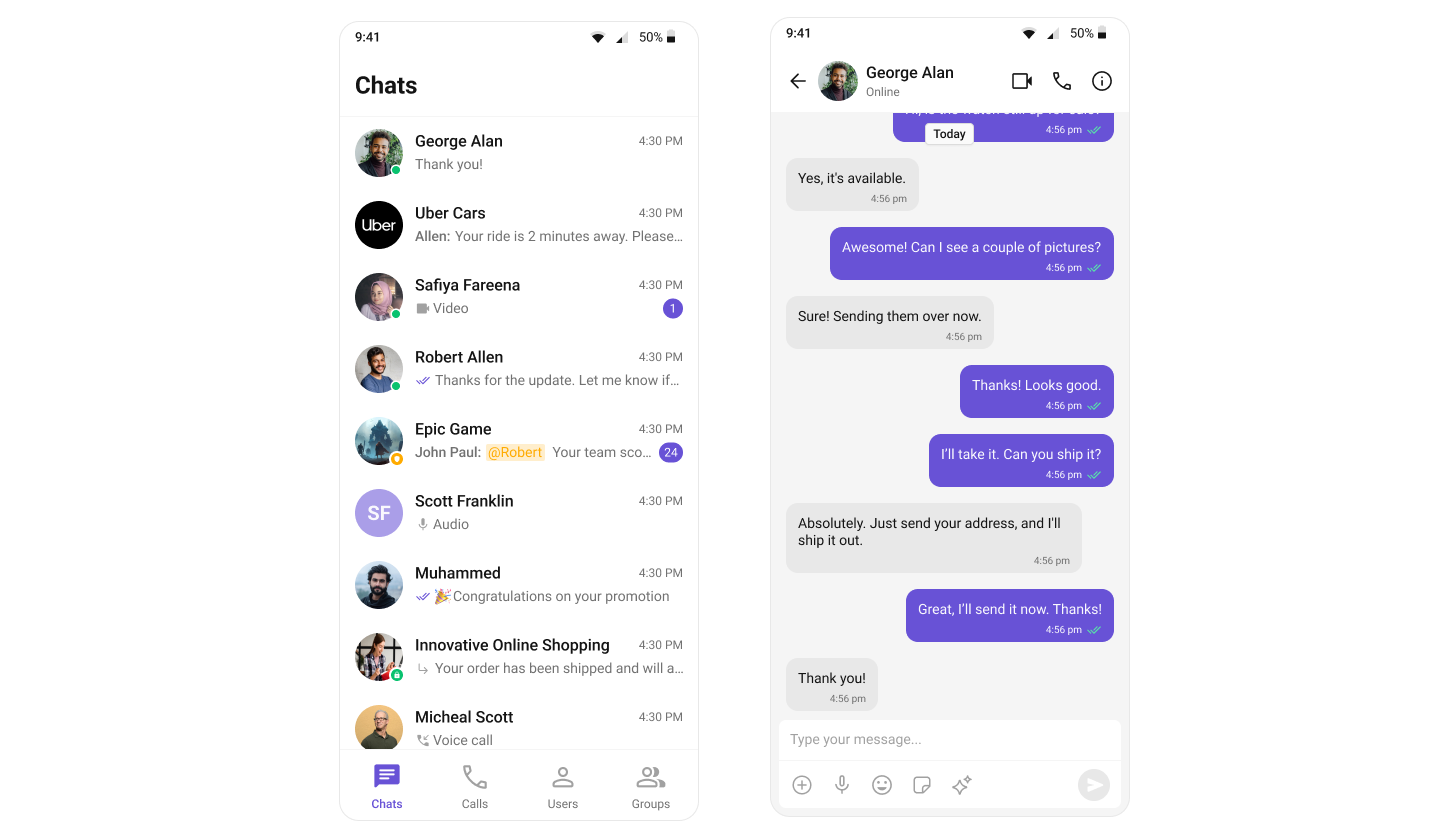
- Sidebar (Conversation List) – Displays recent conversations with active users and groups.
- Message View – Shows the selected chat with real-time messages.
- Message Input Box – Allows users to send messages seamlessly.
Step-by-Step Guide
Step 1: Create a Tab Component
To manage navigation, let’s build aCometChatTabs component. This component will render different tabs and allow switching between sections dynamically.
Folder Structure
Create aTabbedActivity inside your src directory and add the following files:
src/main/java/your-package-name/
├── TabbedActivity.kt
├── ChatsFragment.kt
├── CallLogsFragment.kt
├── UsersFragment.kt
├── GroupsFragment.kt

src/main/java/your-package-name/
├── res/
│   ├── layout/
│   │   ├── activity_tabbed.xml
│   │   ├── fragment_chats.xml
│   │   ├── fragment_call_logs.xml
│   │   ├── fragment_users.xml
│   │   └── fragment_groups.xml
│   └── menu/
│       └── bottom_nav_menu.xml
Download the Icons
These icons are available in the CometChat UI Kit res folder. You can find them at:🔗 GitHub Assets Folder
Implementation
- Kotlin
- Java
- XML
TabbedActivity.kt
import android.os.Bundle
import androidx.activity.enableEdgeToEdge
import androidx.appcompat.app.AppCompatActivity
import androidx.core.view.ViewCompat
import androidx.core.view.WindowInsetsCompat
import androidx.fragment.app.Fragment

import com.google.android.material.bottomnavigation.BottomNavigationView

class TabbedActivity : AppCompatActivity() {

    private lateinit var bottomNavigationView: BottomNavigationView

    override fun onCreate(savedInstanceState: Bundle?) {
        super.onCreate(savedInstanceState)
        enableEdgeToEdge()
        setContentView(R.layout.activity_tabbed)

        setupWindowInsets()
        initViews()
        setupNavigation(savedInstanceState)
    }

    private fun setupWindowInsets() {
        ViewCompat.setOnApplyWindowInsetsListener(findViewById(R.id.main)) { v, insets ->
            val systemBars = insets.getInsets(WindowInsetsCompat.Type.systemBars())
            v.setPadding(systemBars.left, systemBars.top, systemBars.right, systemBars.bottom)
            insets
        }
    }

    private fun initViews() {
        bottomNavigationView = findViewById(R.id.bottomNavigationView)
    }

    private fun setupNavigation(savedInstanceState: Bundle?) {
        bottomNavigationView.setOnItemSelectedListener { item ->
            val fragment = createFragmentForNavItem(item.itemId)
            replaceFragment(fragment)
            true
        }

        // Set default fragment only when activity is first created
        if (savedInstanceState == null) {
            replaceFragment(ChatsFragment())
            bottomNavigationView.selectedItemId = R.id.nav_chats
        }
    }

    private fun createFragmentForNavItem(itemId: Int): Fragment {
        return when (itemId) {
            R.id.nav_chats -> ChatsFragment()
            R.id.nav_call_logs -> CallLogsFragment()
            R.id.nav_users -> UsersFragment()
            R.id.nav_groups -> GroupsFragment()
            else -> ChatsFragment()
        }
    }

    private fun replaceFragment(fragment: Fragment) {
        supportFragmentManager.beginTransaction()
            .replace(R.id.fragmentContainer, fragment)
            .commit()
    }
}
TabbedActivity.java
import android.os.Bundle;
import android.view.View;
import android.view.WindowInsets;
import android.view.WindowInsetsController;
import androidx.appcompat.app.AppCompatActivity;
import androidx.core.view.ViewCompat;
import androidx.core.view.WindowInsetsCompat;
import androidx.fragment.app.Fragment;

import com.google.android.material.bottomnavigation.BottomNavigationView;

public class TabbedActivity extends AppCompatActivity {

    private BottomNavigationView bottomNavigationView;

    @Override
    protected void onCreate(Bundle savedInstanceState) {
        super.onCreate(savedInstanceState);
        enableEdgeToEdge(); // Optional depending on your implementation
        setContentView(R.layout.activity_tabbed);

        setupWindowInsets();
        initViews();
        setupNavigation(savedInstanceState);
    }

    private void enableEdgeToEdge() {
        // This is equivalent to enableEdgeToEdge() in Kotlin
        getWindow().setDecorFitsSystemWindows(false);
    }

    private void setupWindowInsets() {
        View main = findViewById(R.id.main);
        ViewCompat.setOnApplyWindowInsetsListener(main, (v, insets) -> {
            WindowInsetsCompat systemBars = insets.getInsets(WindowInsetsCompat.Type.systemBars());
            v.setPadding(systemBars.left, systemBars.top, systemBars.right, systemBars.bottom);
            return insets;
        });
    }

    private void initViews() {
        bottomNavigationView = findViewById(R.id.bottomNavigationView);
    }

    private void setupNavigation(Bundle savedInstanceState) {
        bottomNavigationView.setOnItemSelectedListener(item -> {
            Fragment fragment = createFragmentForNavItem(item.getItemId());
            replaceFragment(fragment);
            return true;
        });

        // Set default fragment only when activity is first created
        if (savedInstanceState == null) {
            replaceFragment(new ChatsFragment());
            bottomNavigationView.setSelectedItemId(R.id.nav_chats);
        }
    }

    private Fragment createFragmentForNavItem(int itemId) {
        switch (itemId) {
            case R.id.nav_chats:
                return new ChatsFragment();
            case R.id.nav_call_logs:
                return new CallLogsFragment();
            case R.id.nav_users:
                return new UsersFragment();
            case R.id.nav_groups:
                return new GroupsFragment();
            default:
                return new ChatsFragment();
        }
    }

    private void replaceFragment(Fragment fragment) {
        getSupportFragmentManager().beginTransaction()
                .replace(R.id.fragmentContainer, fragment)
                .commit();
    }
}
activity_tabbed.xml
<?xml version="1.0" encoding="utf-8"?>
<LinearLayout
    xmlns:android="http://schemas.android.com/apk/res/android"
    xmlns:app="http://schemas.android.com/apk/res-auto"
    android:id="@+id/main"
    android:layout_width="match_parent"
    android:layout_height="match_parent"
    android:orientation="vertical">

    <FrameLayout
        android:id="@+id/fragmentContainer"
        android:layout_width="match_parent"
        android:layout_height="0dp"
        android:layout_weight="1"/>

    <com.google.android.material.bottomnavigation.BottomNavigationView
        android:id="@+id/bottomNavigationView"
        android:layout_width="match_parent"
        android:layout_height="wrap_content"
        app:menu="@menu/bottom_nav_menu"/>

</LinearLayout>
res/menu/bottom_nav_menu.xml
<?xml version="1.0" encoding="utf-8"?>
<menu xmlns:android="http://schemas.android.com/apk/res/android">
    <item
        android:id="@+id/nav_chats"
        android:icon="@drawable/ic_chats"
        android:title="Chats"/>
    <item
        android:id="@+id/nav_call_logs"
        android:icon="@drawable/ic_calls"
        android:title="Call Logs"/>
    <item
        android:id="@+id/nav_users"
        android:icon="@drawable/ic_user"
        android:title="Users"/>
    <item
        android:id="@+id/nav_groups"
        android:icon="@drawable/ic_group"
        android:title="Groups"/>
</menu>
res/menu/ic_chats.xml
<vector xmlns:android="http://schemas.android.com/apk/res/android"
    xmlns:tools="http://schemas.android.com/tools"
    android:width="32dp"
    android:height="32dp"
    android:autoMirrored="true"
    android:viewportWidth="32"
    android:viewportHeight="32">

    <group>

        <clip-path android:pathData="M0,0h32v32h-32z" />

        <path
            android:fillColor="#A1A1A1"
            android:pathData="M8.052,23.332L5.382,26.001C5.003,26.381 4.567,26.466 4.073,26.257C3.58,26.048 3.333,25.675 3.333,25.137V5.742C3.333,5.069 3.567,4.499 4.034,4.032C4.5,3.565 5.07,3.332 5.744,3.332H26.257C26.93,3.332 27.5,3.565 27.967,4.032C28.434,4.499 28.667,5.069 28.667,5.742V20.922C28.667,21.595 28.434,22.165 27.967,22.632C27.5,23.099 26.93,23.332 26.257,23.332H8.052ZM9.333,18.332H17.333C17.617,18.332 17.854,18.236 18.046,18.044C18.238,17.853 18.333,17.615 18.333,17.332C18.333,17.048 18.238,16.811 18.046,16.619C17.854,16.428 17.617,16.332 17.333,16.332H9.333C9.05,16.332 8.813,16.428 8.621,16.62C8.429,16.812 8.333,17.049 8.333,17.332C8.333,17.616 8.429,17.853 8.621,18.045C8.813,18.236 9.05,18.332 9.333,18.332ZM9.333,14.332H22.667C22.95,14.332 23.188,14.236 23.379,14.044C23.571,13.853 23.667,13.615 23.667,13.332C23.667,13.048 23.571,12.811 23.379,12.619C23.188,12.428 22.95,12.332 22.667,12.332H9.333C9.05,12.332 8.813,12.428 8.621,12.62C8.429,12.811 8.333,13.049 8.333,13.332C8.333,13.616 8.429,13.853 8.621,14.045C8.813,14.236 9.05,14.332 9.333,14.332ZM9.333,10.332H22.667C22.95,10.332 23.188,10.236 23.379,10.044C23.571,9.853 23.667,9.615 23.667,9.332C23.667,9.048 23.571,8.811 23.379,8.619C23.188,8.428 22.95,8.332 22.667,8.332H9.333C9.05,8.332 8.813,8.428 8.621,8.62C8.429,8.811 8.333,9.049 8.333,9.332C8.333,9.616 8.429,9.853 8.621,10.045C8.813,10.236 9.05,10.332 9.333,10.332Z"
            tools:ignore="VectorPath" />

    </group>

</vector>
res/menu/ic_calls.xml
<vector xmlns:android="http://schemas.android.com/apk/res/android"
    xmlns:tools="http://schemas.android.com/tools"
    android:width="32dp"
    android:height="32dp"
    android:autoMirrored="true"
    android:viewportWidth="32"
    android:viewportHeight="32">

    <path
        android:fillColor="#A1A1A1"
        android:pathData="M26.335,27.778C23.765,27.778 21.159,27.17 18.518,25.953C15.878,24.736 13.448,23.01 11.229,20.773C8.993,18.554 7.266,16.126 6.049,13.489C4.832,10.852 4.224,8.243 4.224,5.661C4.224,5.254 4.362,4.912 4.637,4.636C4.912,4.361 5.256,4.223 5.668,4.223H10.424C10.735,4.223 11.001,4.327 11.221,4.536C11.442,4.746 11.591,5.011 11.668,5.334L12.556,9.592C12.594,9.89 12.582,10.164 12.521,10.414C12.46,10.664 12.344,10.876 12.175,11.05L8.941,14.334C9.478,15.26 10.058,16.127 10.681,16.937C11.304,17.747 11.99,18.518 12.741,19.25C13.504,20.035 14.312,20.758 15.166,21.419C16.019,22.079 16.92,22.673 17.868,23.2L21.047,19.978C21.25,19.76 21.483,19.61 21.744,19.528C22.006,19.447 22.269,19.426 22.535,19.467L26.643,20.332C26.971,20.411 27.243,20.58 27.458,20.84C27.672,21.099 27.779,21.39 27.779,21.711V26.334C27.779,26.746 27.642,27.09 27.367,27.365C27.092,27.64 26.748,27.778 26.335,27.778ZM7.896,12.378L10.429,9.823L9.713,6.334H6.363C6.415,7.245 6.561,8.197 6.802,9.189C7.042,10.182 7.407,11.245 7.896,12.378ZM19.852,24.2C20.73,24.608 21.675,24.937 22.689,25.189C23.702,25.441 24.696,25.593 25.669,25.645V22.289L22.379,21.595L19.852,24.2Z"
        tools:ignore="VectorPath" />

</vector>
res/menu/ic_user.xml
<vector xmlns:android="http://schemas.android.com/apk/res/android"
    android:width="24dp"
    android:height="24dp"
    android:autoMirrored="true"
    android:tint="#000000"
    android:viewportWidth="24"
    android:viewportHeight="24">

    <path
        android:fillColor="@android:color/white"
        android:pathData="M12,5.9c1.16,0 2.1,0.94 2.1,2.1s-0.94,2.1 -2.1,2.1S9.9,9.16 9.9,8s0.94,-2.1 2.1,-2.1m0,9c2.97,0 6.1,1.46 6.1,2.1v1.1L5.9,18.1L5.9,17c0,-0.64 3.13,-2.1 6.1,-2.1M12,4C9.79,4 8,5.79 8,8s1.79,4 4,4 4,-1.79 4,-4 -1.79,-4 -4,-4zM12,13c-2.67,0 -8,1.34 -8,4v3h16v-3c0,-2.66 -5.33,-4 -8,-4z" />

</vector>
res/menu/ic_group.xml
<vector xmlns:android="http://schemas.android.com/apk/res/android"
    xmlns:tools="http://schemas.android.com/tools"
    android:width="24dp"
    android:height="24dp"
    android:viewportWidth="49"
    android:viewportHeight="48">
    <path
        android:fillColor="?attr/cometchatPrimaryColor"
        android:pathData="M2.922,34.763C2.922,33.628 3.209,32.601 3.783,31.681C4.357,30.762 5.157,30.068 6.182,29.601C8.475,28.567 10.608,27.81 12.58,27.329C14.552,26.849 16.569,26.608 18.63,26.608C20.691,26.608 22.7,26.849 24.657,27.329C26.614,27.81 28.737,28.566 31.029,29.599C32.056,30.067 32.864,30.76 33.45,31.68C34.037,32.6 34.33,33.627 34.33,34.762V36.4C34.33,37.271 34.02,38.016 33.4,38.636C32.78,39.256 32.034,39.566 31.163,39.566H6.088C5.207,39.566 4.459,39.256 3.844,38.636C3.229,38.016 2.922,37.271 2.922,36.4V34.763ZM42.922,39.566H36.722C36.933,39.055 37.115,38.543 37.268,38.028C37.421,37.513 37.497,36.971 37.497,36.4V34.766C37.497,32.885 37.061,31.296 36.188,29.997C35.316,28.699 33.997,27.614 32.23,26.741C34.28,26.997 36.207,27.354 38.009,27.812C39.812,28.271 41.338,28.825 42.588,29.475C43.683,30.092 44.54,30.839 45.159,31.716C45.779,32.594 46.088,33.576 46.088,34.662V36.393C46.088,37.272 45.778,38.02 45.158,38.639C44.538,39.257 43.793,39.566 42.922,39.566ZM18.63,24C16.469,24 14.685,23.296 13.276,21.887C11.868,20.479 11.163,18.694 11.163,16.533C11.163,14.372 11.868,12.588 13.276,11.179C14.685,9.771 16.469,9.066 18.63,9.066C20.791,9.066 22.576,9.771 23.984,11.179C25.393,12.588 26.097,14.372 26.097,16.533C26.097,18.694 25.393,20.479 23.984,21.887C22.576,23.296 20.791,24 18.63,24ZM36.697,16.514C36.697,18.661 35.993,20.441 34.584,21.855C33.176,23.268 31.391,23.975 29.23,23.975C28.891,23.975 28.494,23.947 28.038,23.891C27.582,23.835 27.179,23.749 26.83,23.631C27.659,22.751 28.288,21.708 28.718,20.501C29.148,19.294 29.363,17.97 29.363,16.528C29.363,15.086 29.148,13.779 28.718,12.605C28.287,11.431 27.658,10.363 26.83,9.4C27.191,9.288 27.588,9.204 28.022,9.149C28.455,9.094 28.858,9.066 29.23,9.066C31.391,9.066 33.176,9.773 34.584,11.185C35.993,12.598 36.697,14.375 36.697,16.514ZM6.088,36.4H31.163V34.771C31.163,34.284 31.024,33.824 30.747,33.391C30.469,32.958 30.128,32.641 29.722,32.441C27.516,31.436 25.583,30.74 23.921,30.354C22.26,29.968 20.499,29.775 18.638,29.775C16.772,29.775 14.998,29.968 13.314,30.354C11.63,30.74 9.691,31.436 7.497,32.441C7.08,32.641 6.741,32.959 6.48,33.394C6.219,33.829 6.088,34.287 6.088,34.766V36.4ZM18.627,20.833C19.857,20.833 20.882,20.425 21.701,19.607C22.521,18.79 22.93,17.766 22.93,16.536C22.93,15.306 22.522,14.282 21.704,13.462C20.887,12.643 19.863,12.233 18.633,12.233C17.403,12.233 16.379,12.642 15.559,13.459C14.74,14.277 14.33,15.3 14.33,16.53C14.33,17.76 14.739,18.785 15.556,19.604C16.374,20.424 17.397,20.833 18.627,20.833Z"
        tools:ignore="VectorPath" />
</vector>
You must use an activity that supports the lifecycle API, such as:
AppCompatActivityComponentActivityFragmentActivity
Step 3: Create Fragments for Chat, Calls, Users and Groups
Chats Fragment
- Kotlin
- Java
- XML
ChatsFragment.kt
import android.os.Bundle
import android.view.LayoutInflater
import android.view.View
import android.view.ViewGroup

import androidx.fragment.app.Fragment

class ChatsFragment : Fragment() {

    override fun onCreateView(
        inflater: LayoutInflater, container: ViewGroup?, savedInstanceState: Bundle?
    ): View? {
        return inflater.inflate(R.layout.fragment_chats, container, false)
    }
}
ChatsFragment.java
import android.os.Bundle;
import android.view.LayoutInflater;
import android.view.View;
import android.view.ViewGroup;

import androidx.annotation.NonNull;
import androidx.annotation.Nullable;
import androidx.fragment.app.Fragment;

public class ChatsFragment extends Fragment {

    @Nullable
    @Override
    public View onCreateView(@NonNull LayoutInflater inflater,
                             @Nullable ViewGroup container,
                             @Nullable Bundle savedInstanceState) {
        return inflater.inflate(R.layout.fragment_chats, container, false);
    }
}
res/layout/fragment_chats.xml
<?xml version="1.0" encoding="utf-8"?>
<LinearLayout
    xmlns:android="http://schemas.android.com/apk/res/android"
    xmlns:app="http://schemas.android.com/apk/res-auto"
    android:layout_width="match_parent"
    android:layout_height="match_parent"
    android:orientation="vertical">

    <com.cometchat.chatuikit.conversations.CometChatConversations
        android:id="@+id/cometChatConversations"
        android:layout_width="match_parent"
        android:layout_height="match_parent"
        app:background="@color/white"/>

</LinearLayout>
Call Logs Fragment
Make sure you’ve added the Calls SDK dependency to enable voice and video calling features.
- Kotlin
- Java
- XML
CallLogsFragment.kt
import android.os.Bundle
import android.view.LayoutInflater
import android.view.View
import android.view.ViewGroup

import androidx.fragment.app.Fragment

class CallLogsFragment : Fragment() {

    override fun onCreateView(
        inflater: LayoutInflater, container: ViewGroup?, savedInstanceState: Bundle?
    ): View? {
        return inflater.inflate(R.layout.fragment_call_logs, container, false)
    }
}
CallLogsFragment.java
import android.os.Bundle;
import android.view.LayoutInflater;
import android.view.View;
import android.view.ViewGroup;

import androidx.annotation.Nullable;
import androidx.fragment.app.Fragment;

public class CallLogsFragment extends Fragment {

    @Nullable
    @Override
    public View onCreateView(LayoutInflater inflater, @Nullable ViewGroup container,
                             @Nullable Bundle savedInstanceState) {
        return inflater.inflate(R.layout.fragment_call_logs, container, false);
    }
}
res/layout/fragment_call_logs.xml
<?xml version="1.0" encoding="utf-8"?>
<LinearLayout
    xmlns:android="http://schemas.android.com/apk/res/android"
    xmlns:app="http://schemas.android.com/apk/res-auto"
    android:layout_width="match_parent"
    android:layout_height="match_parent"
    android:orientation="vertical">

    <com.cometchat.chatuikit.calls.calllogs.CometChatCallLogs
        android:id="@+id/call_log"
        android:layout_width="match_parent"
        android:layout_height="match_parent" />

</LinearLayout>
Users Fragment
- Kotlin
- Java
- XML
UsersFragment.kt
import android.os.Bundle
import android.view.LayoutInflater
import android.view.View
import android.view.ViewGroup

import androidx.fragment.app.Fragment

class UsersFragment : Fragment() {

    override fun onCreateView(
        inflater: LayoutInflater, container: ViewGroup?, savedInstanceState: Bundle?
    ): View? {
        return inflater.inflate(R.layout.fragment_users, container, false)
    }
}
UsersFragment.java
import android.os.Bundle;
import android.view.LayoutInflater;
import android.view.View;
import android.view.ViewGroup;

import androidx.annotation.Nullable;
import androidx.fragment.app.Fragment;

public class UsersFragment extends Fragment {

    @Nullable
    @Override
    public View onCreateView(LayoutInflater inflater, @Nullable ViewGroup container,
                             @Nullable Bundle savedInstanceState) {
        return inflater.inflate(R.layout.fragment_users, container, false);
    }
}
res/layout/fragment_users.xml
<?xml version="1.0" encoding="utf-8"?>
<LinearLayout
    xmlns:android="http://schemas.android.com/apk/res/android"
    xmlns:app="http://schemas.android.com/apk/res-auto"
    android:layout_width="match_parent"
    android:layout_height="match_parent"
    android:orientation="vertical">

    <com.cometchat.chatuikit.users.CometChatUsers
        android:layout_width="match_parent"
        android:layout_height="match_parent"
        android:id="@+id/users"
        />

</LinearLayout>
Groups Fragment
- Kotlin
- Java
- XML
GroupsFragment.kt
import android.os.Bundle
import android.view.LayoutInflater
import android.view.View
import android.view.ViewGroup

import androidx.fragment.app.Fragment

class GroupsFragment : Fragment() {

    override fun onCreateView(
        inflater: LayoutInflater, container: ViewGroup?, savedInstanceState: Bundle?
    ): View? {
        return inflater.inflate(R.layout.fragment_groups, container, false)
    }
}
GroupsFragment.java
import android.os.Bundle;
import android.view.LayoutInflater;
import android.view.View;
import android.view.ViewGroup;

import androidx.annotation.Nullable;
import androidx.fragment.app.Fragment;

public class GroupsFragment extends Fragment {

    @Nullable
    @Override
    public View onCreateView(LayoutInflater inflater, @Nullable ViewGroup container,
                             @Nullable Bundle savedInstanceState) {
        return inflater.inflate(R.layout.fragment_groups, container, false);
    }
}
res/layout/fragment_groups.xml
<?xml version="1.0" encoding="utf-8"?>
<LinearLayout
    xmlns:android="http://schemas.android.com/apk/res/android"
    xmlns:app="http://schemas.android.com/apk/res-auto"
    android:layout_width="match_parent"
    android:layout_height="match_parent"
    android:orientation="vertical">

    <com.cometchat.chatuikit.groups.CometChatGroups
        android:id="@+id/groups"
        android:layout_height="match_parent"
        android:layout_width="match_parent" />

</LinearLayout>
Step 3: Update MainActivity
Update theMainActivity to navigate to the MessageActivity:
- Kotlin
- Java
MainActivity.kt
import android.os.Bundle
import android.util.Log
import androidx.activity.ComponentActivity
import androidx.activity.enableEdgeToEdge
import com.cometchat.chat.core.CometChat
import com.cometchat.chat.exceptions.CometChatException
import com.cometchat.chat.models.User
import com.cometchat.chatuikit.shared.cometchatuikit.CometChatUIKit
import com.cometchat.chatuikit.shared.cometchatuikit.UIKitSettings

class MainActivity : ComponentActivity() {

    private val TAG = "MainActivity"

    private val appID = "APP_ID" // Replace with your App ID
    private val region = "REGION" // Replace with your App Region
    private val authKey = "AUTH_KEY" // Replace with your Auth Key or leave blank if you are authenticating using Auth Token

    private val uiKitSettings = UIKitSettings.UIKitSettingsBuilder()
        .setRegion(region)
        .setAppId(appID)
        .setAuthKey(authKey)
        .subscribePresenceForAllUsers()
        .build()

    override fun onCreate(savedInstanceState: Bundle?) {
        super.onCreate(savedInstanceState)
        enableEdgeToEdge()

        CometChatUIKit.init(this, uiKitSettings, object : CometChat.CallbackListener<String?>() {
            override fun onSuccess(successString: String?) {

                Log.d(TAG, "Initialization completed successfully")

                loginUser()
            }

            override fun onError(e: CometChatException?) {}
        })
    }

    private fun loginUser() {
        CometChatUIKit.login("cometchat-uid-1", object : CometChat.CallbackListener<User>() {
            override fun onSuccess(user: User) {

                // Launch Tab-Based Chat Experience (Chats, Calls, Users, Groups)
                startActivity(Intent(this@MainActivity, TabbedActivity::class.java))
            }

            override fun onError(e: CometChatException) {
                // Handle login failure (e.g. show error message or retry)
                Log.e("Login", "Login failed: ${e.message}")
            }
        })
    }
}
MainActivity.java
package com.example.uikitsexamples;

import android.content.Intent;
import android.os.Bundle;
import android.util.Log;
import androidx.activity.ComponentActivity;
import com.cometchat.chat.core.CometChat;
import com.cometchat.chat.exceptions.CometChatException;
import com.cometchat.chat.models.User;
import com.cometchat.chatuikit.shared.cometchatuikit.CometChatUIKit;
import com.cometchat.chatuikit.shared.cometchatuikit.UIKitSettings;

public class MainActivity extends ComponentActivity {

    private static final String TAG = "MainActivity";

    private final String appID = "APP_ID"; // Replace with your App ID
    private final String region = "REGION"; // Replace with your App Region
    private final String authKey = "AUTH_KEY"; // Replace with your Auth Key

    @Override
    protected void onCreate(Bundle savedInstanceState) {
        super.onCreate(savedInstanceState);
        getWindow().setDecorFitsSystemWindows(false); // Equivalent to enableEdgeToEdge()

        UIKitSettings uiKitSettings = new UIKitSettings.UIKitSettingsBuilder()
                .setRegion(region)
                .setAppId(appID)
                .setAuthKey(authKey)
                .subscribePresenceForAllUsers()
                .build();

        CometChatUIKit.init(this, uiKitSettings, new CometChat.CallbackListener<String>() {
            @Override
            public void onSuccess(String success) {
                Log.d(TAG, "Initialization completed successfully");
                loginUser();
            }

            @Override
            public void onError(CometChatException e) {
                Log.e(TAG, "Initialization failed: " + (e != null ? e.getMessage() : "Unknown error"));
            }
        });
    }

    private void loginUser() {
        CometChatUIKit.login("cometchat-uid-1", new CometChat.CallbackListener<User>() {
            @Override
            public void onSuccess(User user) {
                Log.d(TAG, "Login successful for user: " + user.getUid());

                // Launch Tab-Based Chat Experience (Chats, Calls, Users, Groups)
                startActivity(new Intent(MainActivity.this, TabbedActivity.class));
            }

            @Override
            public void onError(CometChatException e) {
                Log.e("Login", "Login failed: " + (e != null ? e.getMessage() : "Unknown error"));
            }
        });
    }
}
Running the Project
Once the components are configured, build and run the app:gradle build
Application class.
Next Steps
Enhance the User Experience
- Advanced Customizations – Personalize the chat UI to align with your brand.